Maxis Highway Override
Questa documentazione è stata aggiornata l'ultima volta con NAM 35. È in fase di riscrittura.
Questa documentazione non è ancora stata tradotta nella vostra lingua.

Preface
Overview
The Maxis Highway Override (abbreviated MHO ), sometimes called Project Symphony (abbreviated PS), is an attempt to join the Maxis Highways (abbreviated as MHW) with the Real Highway Mod (RHW) by the total conversion of the MHW. The new MHW will have the specifications of the RHW. It looks like an RHW, rides like an RHW but is built like an MHW.
For new users unfamiliar with the RHW, the MHO can be a first step at getting familiar with the RHW paradigm. However, for experienced users who know their way around RHW, this can be a very powerful supplement to existing RHW systems.
NOTE: When reading this document, there may be key terms to take note of or terms that are used differently than normal. This includes the following terms:
- Bridge and Overpass : In the field of transit modding, bridges over other networks and bridges over water and ravines are two completely different things. A bridge that goes over another network is an overpass. A bridge that goes over water is what is considered a bridge. Overpasses and elevated networks have a fixed height, and have to be placed using starters, whereas bridges have to be selected through the bridge selection window, and have a variable height throughout the entire length.
- Carriageway : This may be used as a synonym for a single one-way RHW.
- Diagonal : This refers to being at a 45-degree angle to the SimCity 4 grid.
- Highway : This term will be used universally to refer to freeway, expressway, interstate, divided highway, and dual carriageway.
- LHD and RHD : Left-hand drive and right-hand drive instead refer to which side of the road you drive on, not which side of the car you drive in.
- Orthogonal : This is a synonym for “ perpendicular ” in certain mathematical fields, but in the field of Transit Network Modding, it instead refers to being in line, or parallel, with the SimCity 4 grid. Perpendicular is used instead for networks crossing at 90-degree angles.
Compatibility
The NAM and its plugins are only compatible with SimCity 4 “Rush Hour” or SimCity 4 Deluxe , Version 1.1.638 or higher. It is required that you install the SimCity 4 EP1 Update 1 Patch (for Version 1.1.638) before proceeding with installation. If you have purchased SimCity 4 Deluxe from Steam or another digital retailer, the Version number will be 1.1.641, and should be pre- patched.
Attempting to use this mod with other versions of SimCity 4 will cause the game to instantly crash upon loading.
Disclaimer
The usage of this download is on your own risk. We try to test our products extensively, so they should work properly, but errors may still exist. Feel free to modify the items for yourself and show them in your city journals, but please don’t distribute them without asking first.
Installation and Setup
IMPORTANT!!! IT IS ALWAYS A GOOD IDEA TO CREATE A BACKUP OF YOUR CITIES AND YOUR PLUGINS FOLDER IN THE EVENT THAT SOMETHING GOES WRONG. IF SOMETHING DOES GO WRONG, YOU WILL BE ABLE TO RESTORE YOUR PREVIOUS FILES.
In order to install the Maxis Highway Override Mod using the NAM Installer , you need to select the option for it. If you decide to install this at a later time, simply run the installer again.
NOTE: Since the RHW is required to use this plugin, the RHW will also be automatically selected.
If you are using a Left-Hand Drive installation (cars driving on the left), be sure to select the LHD Plugin.
Within the z___NAM folder should be a folder named Maxis Highway Override. This is where the files for this plugin are found. The files contained are as follows:
- a_Base_Overrides.dat
- a_prop_MHW_Median_Light.dat
- b_Viaduct_Crossings.dat
- c_Viaduct_Crossings_Additional.dat
- d_roundabout_interchanges.dat
- e_ramp_setups.dat
- f_cloverleaf_ramps.dat
- g_t-stack_interchanges.dat
- h_FAMHW.dat
- i_Tunnels.dat
- T21_MHW_MedianLights.dat
- T21_Overrides.dat
- z_EMHW_override_roundabout_interchanges.dat
- z_highway_menu_blocker.dat
Useful links
- Project Symphony Development Thread over at ST and SC4D
- The RHW Interchange Guide
History and Development
Prior to the modern-day developments of RHW, MHW systems were the norm. In this era, the NAM Team created various MHW interchange pieces, such as the MHW Stack, the OxD MHW Interchange, and various three-way interchanges. However, this was always a time-consuming task, due to the MHWs being hard to modify and their under-scaled dimensions, and progressively fewer MHW items were made.
With the advent of RHW Version 3.0, it was now possible to create RHW interchanges solely using RHW. With the RHW’s increasing popularity, more and more modding effort was devoted towards RHW, eventually leaving out MHW out of the interest of modders. However, even before RHW began to overtake MHW, there have been attempts at converting the MHW to a more realistic setup, the most notable at the time was Shadow Assassin’s Urban Highway Mod , but this mod was never released.
During recent years and during P57’s development, the idea was revitalised and experimented with by many NAM Team Members, such as Tarkus (Alex) and GDO29Anagram (Ganaram). These ideas were later picked up by jdenm8 and MandelSoft , and expanded upon with the addition of RHW-styled Ramp Interfaces, and eventually, semi-prefab interchanges. The NAM 31 includes the first public release of this mod.
Changelog
Features added in NAM 35
- New MHO-specific Level Bridges are available, for both L0 and L2 networks.
- Improved support for the NAM RealRailway (RRW) Plugin, as well as Moonlinght’s Alternate El-Rail and Bullet Train (Shinkansen) Mods.
Features added in NAM 31 (initial release)
Basic network functionality, involving models, textures and paths.
Orthogonal and diagonal grade-separated crossings with all Maxis networks
Orthogonal grade-separated crossings with all NWM networks.
Orthogonal grade-separated crossings with all RHW networks.
Support for NAM overpasses, FLUPs and GLR.
Fractional Angled MHW (FAMHW), L0 only.
Basic transitions (ground-to-elevated, MHW-to-RHW and MHW-to-AVE-4)
Four ramp setups (A1, B1, D1, E1) for both height levels. Naming scheme from their respective RHW counterparts*.
Four straight height transitions for MIS ramps*.
Cloverleaf ramps*.
Two semi-prefab roundabout interchanges (two-level and three-level)*.
Four prefab T-stack interchanges (L0xL0, L2xL0, L0xL2, L2xL2)*.
Left Hand Drive support
* Note: orthogonal only
Functionality, Networks, and Networks Types
Because this is a mod that overrides an existing network, Project Symphony networks are identical in function to the original Maxis Highways, as much of the original function is retained. The following networks are included.
Ground-Level Highways
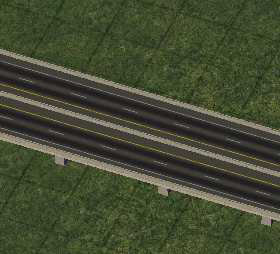
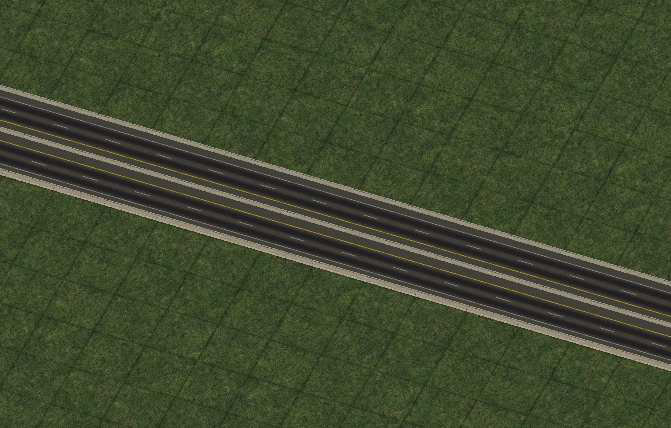
The Ground Level Maxis Highway , or Height Level 0 Maxis Highway (abbreviated as L MHW ) is a fully draggable two-tile network. Both halves of the highway are dragged at the same time.
Project Symphony completely overrides the narrow 2x3 lane Maxis Highway with a wide 2x2 lane RHW-like highway. This means that all your existing Maxis Highways will be replaced by the MHO design. In other words, this is not a starter-override network, but rather, a complete revamp of the base network.
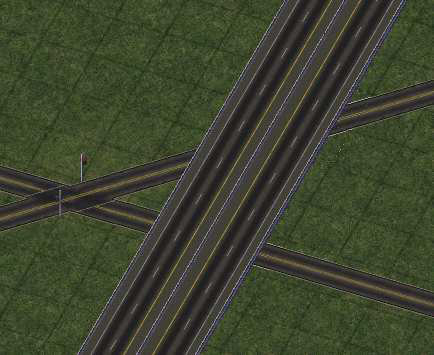
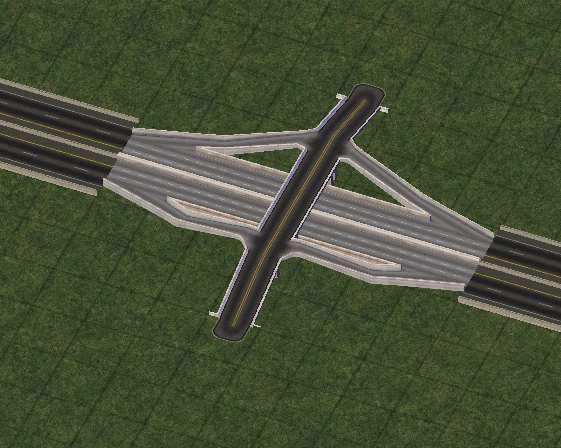
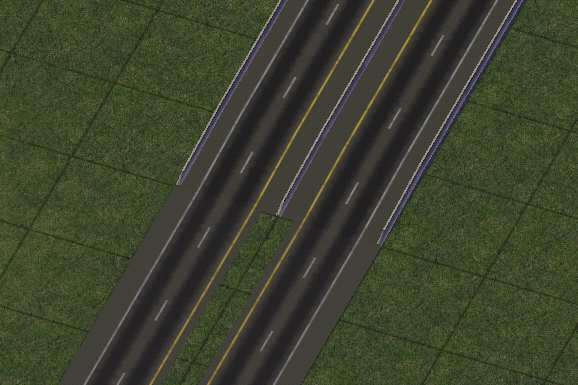
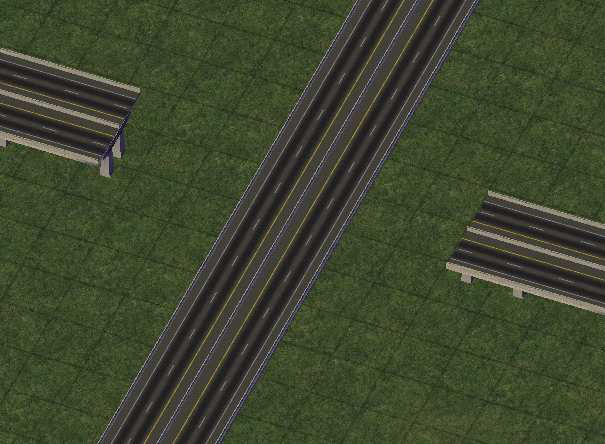
The network has barriers all the way; it has a single centre barrier and two outer barriers, making them distinctive from the RHW.
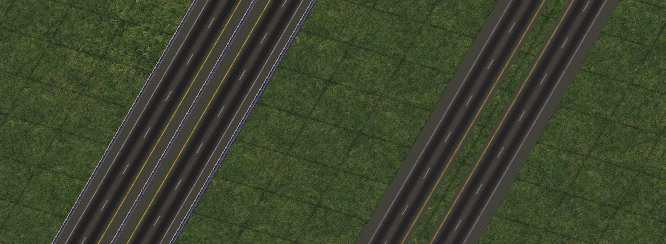
Shown left to right: Project Symphony MHW and Dual RHW-4.
The L0 MHW can’t cross any network at-grade. You need to transition into another network first, like AVE-4 or RHW-4. This is because it’s a limited access network and slow traffic is banned here.
Elevated Highways
The Elevated Highway , or Height Level 2 Maxis Highway (abbreviated as L2 MHW ) is a fully draggable two-tile network. Like its L0-counterpart, this is also a complete override, but only 15 meters higher than its ground level counterpart. It may look a lot like a Dual RHW-4; the only difference is that it only has a single centre barrier instead of a double one.
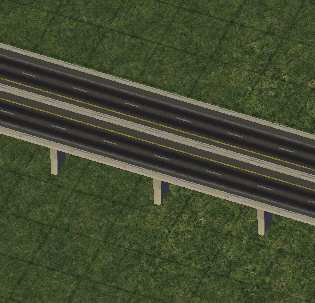
Shown left to right: MHO MHW (L2) and Dual RHW-4 (L2). Note the difference between the pillars and the barriers.
MIS Network
The MIS Ramp , also called MIS Network or just MIS , is a network designed for interchanging traffic between any two RHW networks, or between an RHW network and a non-RHW network. It’s the backbone for designing custom interchanges.
Because of its importance with interchanging traffic, this network can create at-grade crossings with almost every other network.
The Maxis Highway Override uses this network from the RHW, since it would be useless to create two networks with the same function. Therefore, the RHW is a necessary dependency for this mod to work properly. Just with the MHWs, MIS also has a ground-level and elevated version, though the MIS has four elevated counterparts.
NOTE: If you installed the NAM using the NAM Installer, the RHW should be automatically installed when you installed Project Symphony.
Tunnels and Bridges
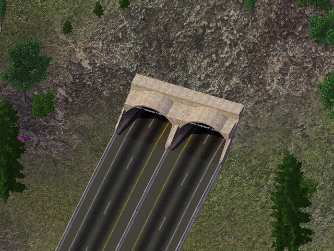
Tunnels
The tunnels for MHW have been repurposed and remodeled to be compatible for the newly- designed MHWs. This requires a custom slope mod, which is also included.
Bridges
The MHO includes two bridges: an L0 Level Bridge and an L2 Level Bridge. The bridges made for Dual RHW-4 can also be used. Due to the slight height differences between Ground MHO Highways and RHW-4, a bridge transition is included to properly transition between the two
Networks
For additional options, it is also possible to use AVE-4 bridges, though these bridges will have a lower capacity.
Puzzle-based Items
Puzzle-based items are static items that can be used for different purposes. These items can be found under the Highways Menu. In order to navigate through the different types of pieces, you must press the TAB key, and to go back, press SHIFT+TAB. To rotate a selected puzzle piece, press the Home and End keys. A comprehensive list of what items are included can be found in
The current Maxis Highway Override contains the following Puzzle-based items:
Ramp Interfaces
Just like the RHW, the Maxis Highway Override has the ability to create custom interchanges. Since making prefabs takes a lot of work and are incredibly inflexible, and that real-life interchanges can be incredibly massive (exceeding the 16x16 tile maximum for puzzle pieces), there instead exists a set of ramp interfaces designed to complement the MIS network.
The MHO borrows many components of the RHW’s Modular Interchange System , a set of interchange pieces which can be assembled in an infinite number of combinations to create any type of interchange. The MHO also adds in its own pieces, but compared to RHW, the selection of features it adds in itself is fairly limited.
These pieces are found under the Ramps Button , located under the buttons from the base networks of the mod.
Curves
Wide Radius Curves allow for a smoother and more realistic turn-radius, enhancing the look and feel of curving networks. These pieces are found under the Curves Button.
This button also contains the Fractional Angled MHW (FAMHW). These pieces are neither orthogonal nor diagonal. These can be used for extremely gentle curves and for going against the orthogonal-diagonal grid in general.

Transitions
Transitions allow you to switch between two different heights of MHW or between different networks. There are two types of height Transitions: Ramp Transitions , which switch between two height levels of MHW, and OnSlope Transitions , which are Height Transitions that have to be placed on slopes. These pieces are found under the Transitions Button.
Prefabs and Semi-Prefabs
Prefabs are pre-made interchanges. These interchanges are very static, but also very easy to build. The original MHW had a lot of those interchanges, but the MHO only offers a very limited amount of them.
There are two kinds of prefabs: Total Prefabs , which are complete interchanges with connections and everything, and Semi-Prefabs , which only contain a part of the interchange and require ramps to be connected later on. Semi-prefabs are a little harder to build, but they are also more flexible than total prefabs.
Tips, Tricks, and Tutorials
Starting off with Project Symphony
As quoted directly from the original SimCity 4 Deluxe User’s Manual , “Highways are very expensive compared to [other networks], and tend to take up a lot of space, but their capacity [and] speed limits are [very] high.” This is still true in Project Symphony.
In fact, most of the traditional crossings with both ground and elevated highways have been modified and are still available, as with the original “humpback” overpasses with Road and Rail. Roads and other networks can still cross under Elevated Highways, and Elevated Rail and Monorail can still cross over Ground Highways. Additionally, other networks added by the NAM (HSR, NWM, RHW) will still cross with these networks.
As these networks are base networks and are “natural” to begin with, both MHW and EMHW will still create neighbour connections as before, and the need of neighbour connection pieces is not necessary.

However, for cities that already have the original Highway Interchanges or the NAM’s Custom Interchanges, none of these interchanges will fit with the revamped highways. Because of the large scaling differences between the original interchanges and the revamped highways, it was decided by the NAM Team that none of these interchanges will be modified.
All original MHW interchanges are incompatible with the Maxis Highway Override and it is recommended to bulldoze and replace them if you have these in your cities. Also, all of the original MHW Interchange menu buttons are disabled; however, several interchanges can still be accessed using Autoplace. Refrain from using these interchanges; they may still work, but they will be visually incompatible with the MHO.

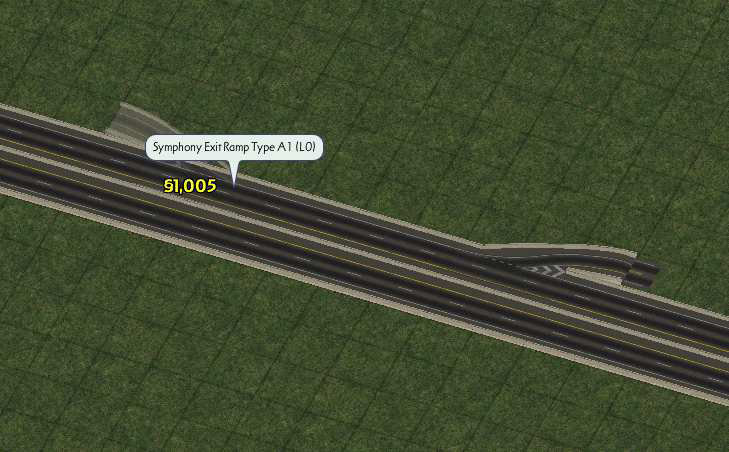
Understanding Ramp Interfaces
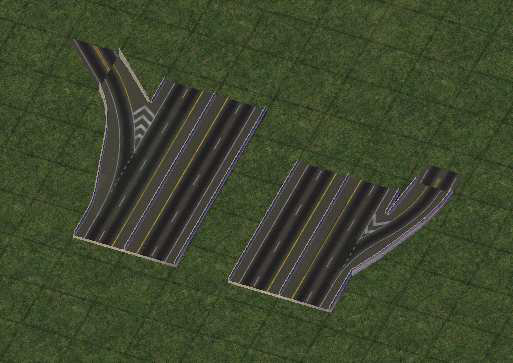
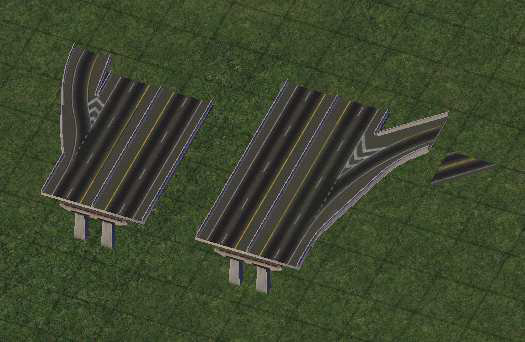
Unlike the RHW, there are only four types of Ramp Interfaces available: A1, B1, D1, and E1, each diagrammed below from left to right.
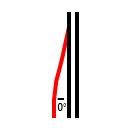
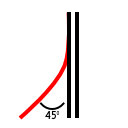
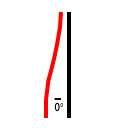
Types A1 and B1 (shown left) branch one lane outwards while retaining the two original lanes of the highway. The branch connects with MIS. Types D1 and E1 split the highway into two MIS.
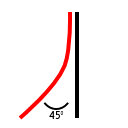
Types A1 and D1 have a parallel branch, while Types B1 and E1 have a branch at a 45-degree angle.
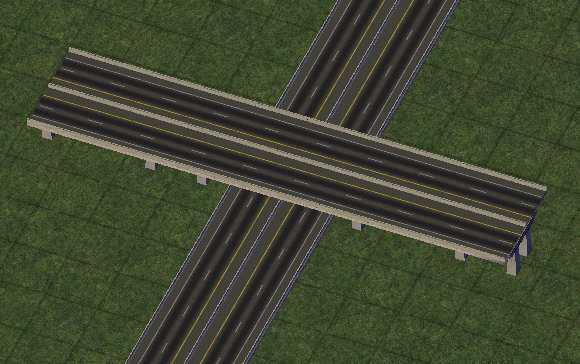
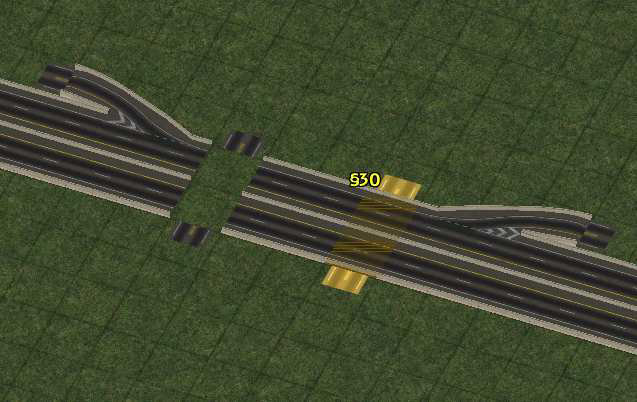
Using Dual RHW-4 Bridges with the Maxis Highway Override
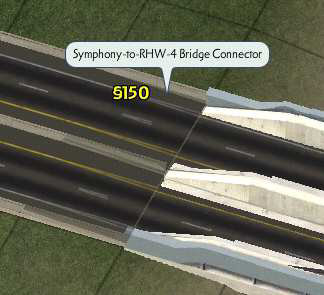
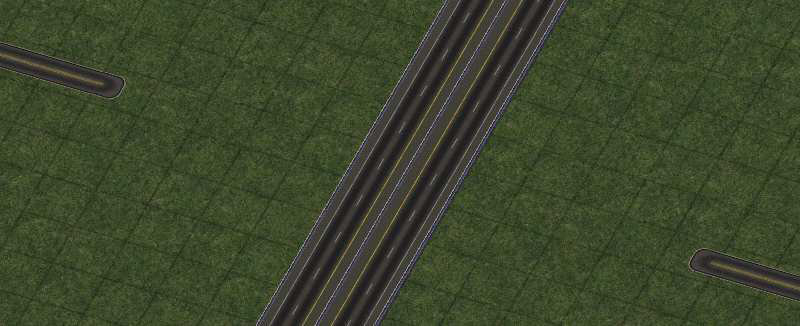
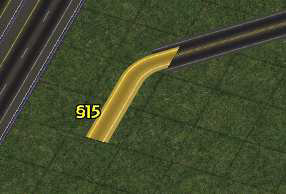
Bridges made for RHW-4 can be used with the MHO. When you build a Dual RHW-4 bridge for a stretch of MHW, you’ll see a subtle height shift:
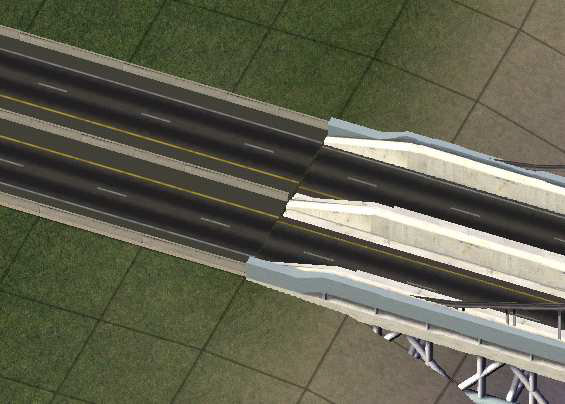
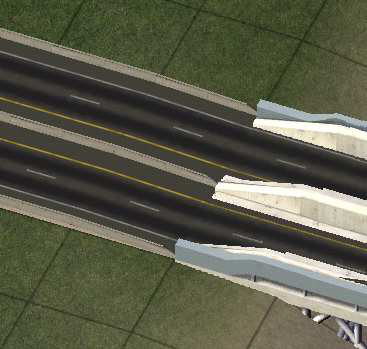
This is because the MHW is raised 0.75m at ground level. Therefore, under the Transition Menu, a Bridge Transition piece is included. Hover this piece over the stretch of MHW and plop it over the network with the lower end facing the bridge. This will result in a much more gentle transition:
Using RHW with the Maxis Highway Override
The Maxis Highway Override is also designed to work with the RHW. You can simply drag the MHW over or under stretches of RHW without any problems. Moreover, you can transition the MHW into a RHW-4. Both MHWs can transition to their respective RHW-4 counterparts with no issues.
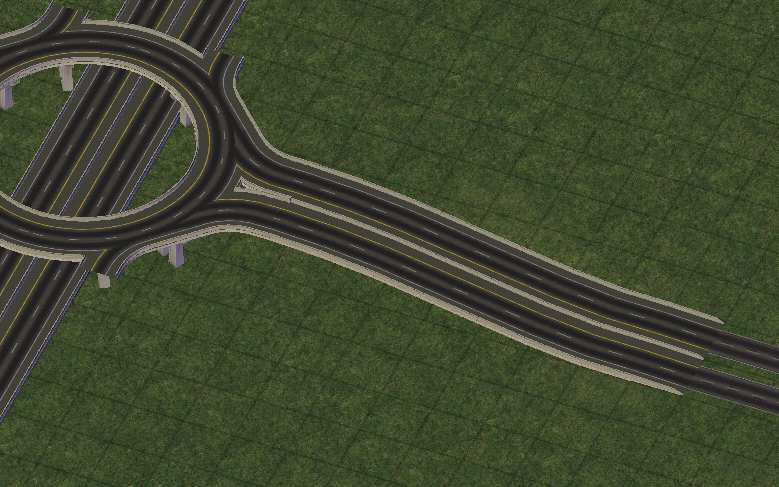
You can also use MHO interchanges for the RHW and vice versa; they will seamlessly transit into each other. For example, the Roundabout Interchange made for the MHO can be made to interface RHW-6S:
Additionally, the MHWs can also be drawn in conjunction with RHW to create a hybrid Multi-RHW.
Interchange Construction
The Maxis Highway Override includes pieces to construct a few types of interchanges. This requires the use of the RHW’s Modular Interchange System. These interchanges are not limited to only the MHO.
The tutorials shown here rely on both MHO and RHW. More advanced tutorials and other interchange designs can be found on the RHW Interchange Guide. The rest is limited to your imagination.
PROTIP: Most interchanges require starting construction at the inside and gradually building out from the centre. This has everything to do with the line-up of all stretches. Keep that in mind as a strategy when you try to build a custom designed interchange.
Diamond interchange
Diamond Interchanges are very simple in design and involve a highway with an arterial road going over or under it. The offramps and onramps create a diamond-like shape with the arterial road, hence the name.
Drag a stretch of L0 MHW. Drag out Road perpendicular to the RHW, starting four tiles away. Do this for both sides of the highway.

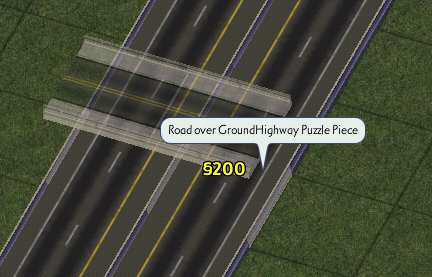
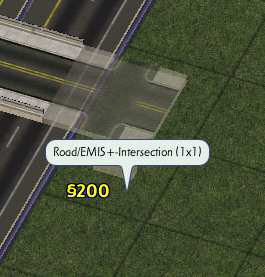
Place the Road over MHW Piece (found in the Roads Menu ) on top of the MHW, in the place as shown. This is where the Road will go over the MHW.

Place the Road-MIS Intersection next to the Road over MHW Pieces as shown. Rotate these pieces accordingly. The markings may be very subtle to notice. This is where the MIS will cross with the Road. Do this for both sides of the interchange.

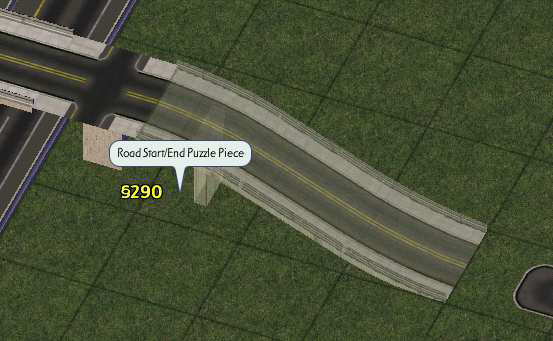
Place the Road Start/End Piece so that it joins with the Road-MIS intersection and the Road. This will connect the overpass with the ground. If the Road on the ground is too close that it gets in the way with placing the Start/End Piece, bulldoze it until it’s at least three tiles from the Road-MIS intersection.

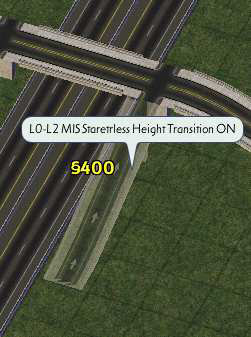
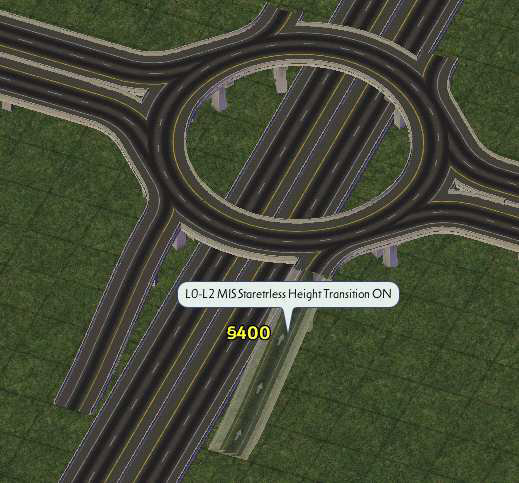
Place an L0-L2 MIS Starterless Height Transition connecting to the Road-MIS crossing. This is found the RHW Transitions Button. This will join the Ramp Interface with the Road. Make sure that the Transition is the correct one, as indicated by the arrows and the word “ON” or “OFF” in the name of the piece. Do this for each of the quadrants.

Place the Type A1 Ramps at the MHW to connect the transitions with the MHW. Do this for each of the quadrants. The completed interchange is quite larger compared to the original Diamond Interchange, but is still very compact.


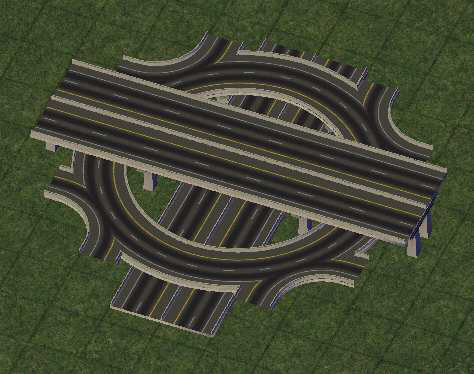
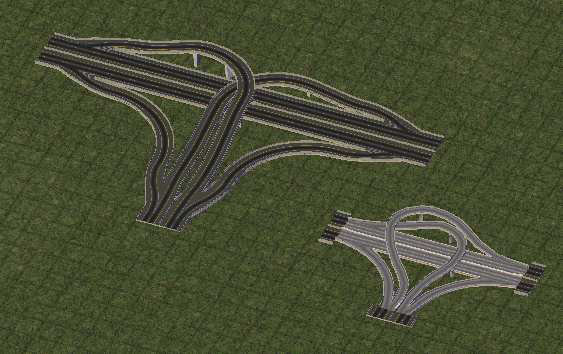
Roundabout Interchanges
Roundabout Interchanges rely on a Roundabout to interchange traffic. This is a space-saving alternative to building other types of interchanges, with the downside that it isn’t very high- capacity. Constructing both the two-level and three-level Roundabout are similar to each other.
Two-level and Three-level Roundabout Interchanges
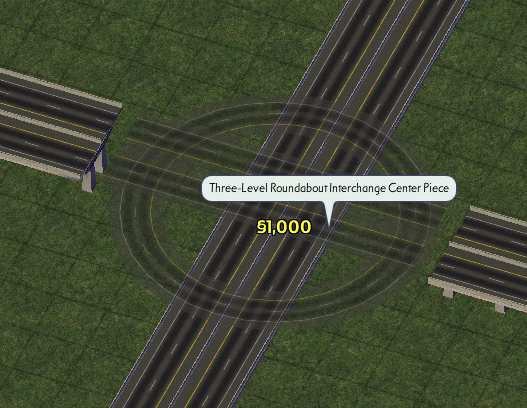
Drag one long stretch of Ground Highway (L0) and two small stretches of Elevated Highway (L2) perpendicular to the Ground Highway and two tiles away. Make sure that you don’t drag the elevated highway straight across; this will prevent the autoplace message for the MHW Stack Interchange to appear. If you do drag the elevated highway straight across and you get the message, simply cancel the message.

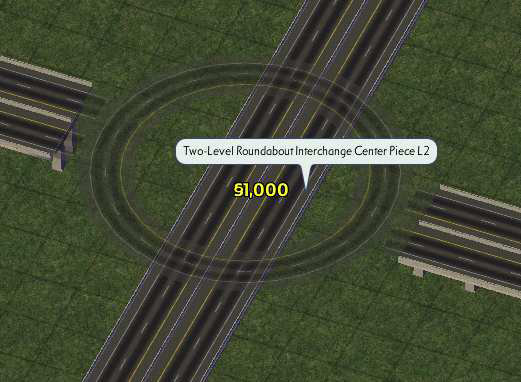
Select from the Prefabs Menu the L0xL2 Three-Level Roundabout Interchange and plop it directly in the middle. This is the core of the entire interchange. If you are using the L0xL2 Two-Level Roundabout , you will notice that the Roundabout is at L2, and that the highway directly connects to the Roundabout.


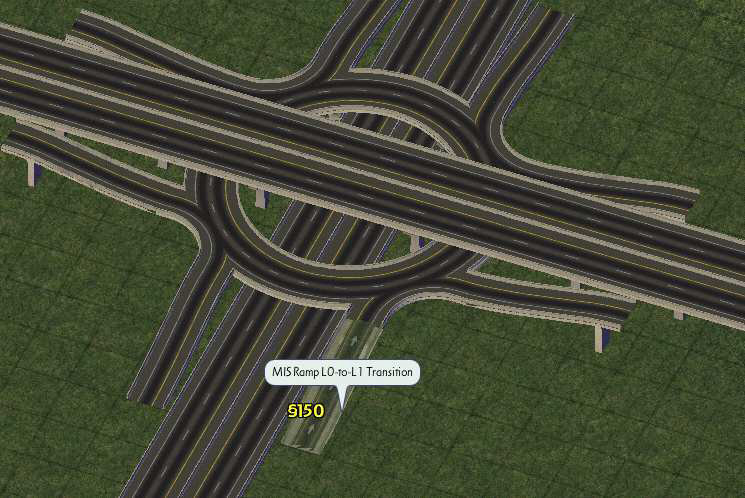
Plop the L0-L1 and L1-L2 MIS Transitions (Found in the Maxis Highway Override Transitions Button), or L0-L2 MIS Starterless Height Transitions for the Two-Level Roundabout (Found in the RHW Transitions Button), at the open ramp ends. This will bring interchanging traffic to and from the highways to the roundabout. You will need eight transitions in total for the Three-Level Roundabout, or four transitions for the Two-Level Roundabout. Keep an eye on the direction of the transitions! Also follow the name of the transitions!


Finally, plop the Type A1 Ramps at the ends of the height transitions to complete this interchange. Eight ramps are needed in total for the Three-Level Roundabout, and four ramps are needed for the Two-Level Roundabout. Afterwards, extend out your highways if needed. The closest analogue to the Roundabout Interchange is the MHW Stack Interchange , in terms of how much space one takes compared to the other.


A Note about the Two-Level Roundabout
The Two-level Roundabout was more designed for connecting a highway (L0 MHW) and an arterial network (Avenue), rather than connecting two highways together. The upper connections can be connected to an MHW Ground to Elevated Transition and then transitioned back to Avenue at ground-level, or the connection can be made directly to Elevated Avenue using the Elevated Avenue to Elevated Highway Transition.
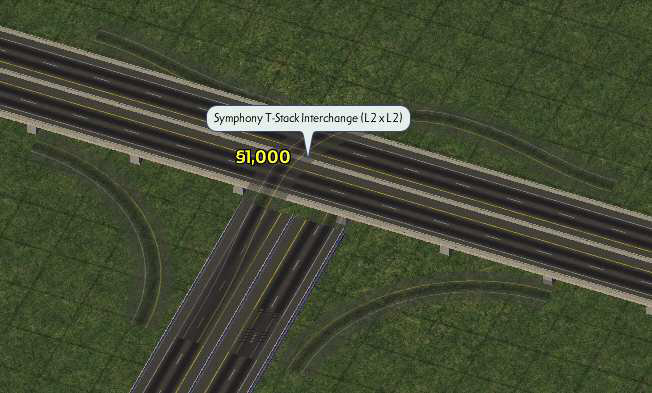
T-Stack Interchanges
The Maxis Highway Override includes only one type of Prefab Interchange: The T-Stack Interchange. Due to a design decision regarding how to implement this type of interchange, this will be the only prefab interchange to be added in the NAM.

This piece is found under the Prefabs Button. Pressing Home and End will rotate between the different height combinations. Drag out the corresponding Highway network out of the stubs after placing.
Alternatively, the T-Stack piece can be placed on top of an already-drawn Highway network. If these networks are already drawn in a T, be sure that the two networks don’t connect. Doing so may trigger building the original MHW T-Stack Interchange. The height levels between the two highways don’t matter, since the proper interchange will always be assigned.
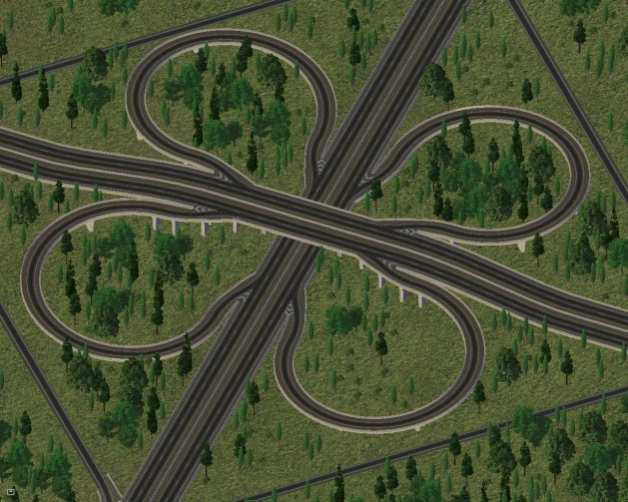
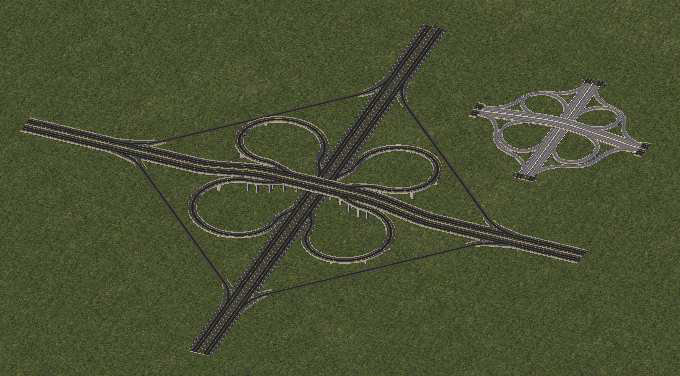
Cloverleaf Interchanges
Cloverleaf Interchanges are one of the first interchange designs used to interchange traffic between two highways. This requires giant loops to interchange left-turning traffic (or right- turning traffic in LHD), with the resulting shape of the interchange bearing semblance to a four- leaf clover, hence the name
Full Cloverleaf Interchange
Drag your L0 MHW stretch first. Drag a small stretch of L2 MHW over it so that it crosses perpendicularly with the L0 MHW. The ground highway needs to be fairly long, and the elevated highway needs to be about 12 or 14 tiles long. This is to prevent triggering the autoplace window for the original MHW Stack Interchange.

Plop the Type A1 ramps at the centre first. Keep one tile between the overpass and the ramp end. Eight ramps are needed in total, four for the elevated highway and four more for the ground highway.

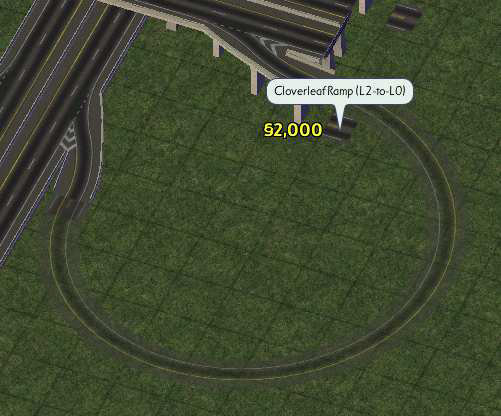
Plop the Cloverleaf Ramps to connect the ends of the ramps. This piece is found under the Curves Button. The cursor for these pieces is positioned at the end of the ramp pieces. This will create the turn loops. Do this for all four quadrants.

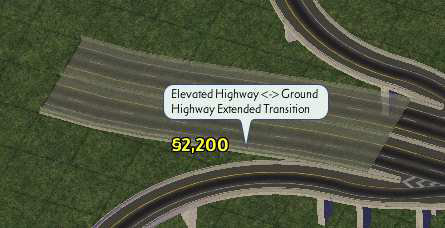
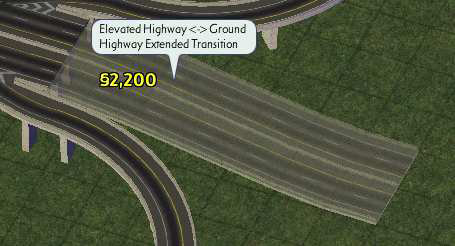
Place down a Ground to Elevated Highway Transition at the ends of the Elevated Highway. This will transition down the Elevated Highway back to the ground. Do this for both ends of the Interchange. Drag out a stretch of Ground Highway out from the stubs.


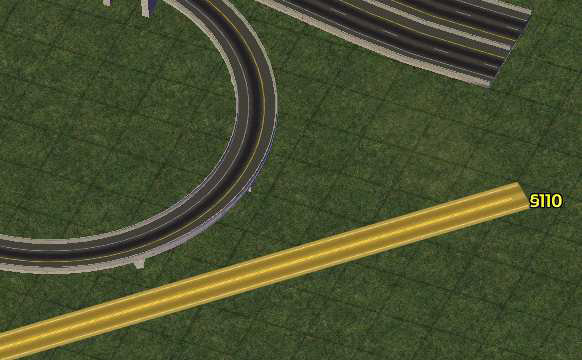
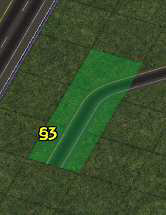
Drag a diagonal stretch of RHW right next to the cloverleaf ramps. This will create the shape of the right-turn ramps (or left-turn in LHD).

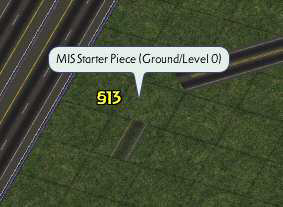
Place down a MIS Starter at one end of the diagonal RHW. Be sure that the yellow line* is on the inside. Bulldoze the construction handle and connect the starter to the diagonal RHW using the RHW Tool.


Click outwards from the starter to convert the RHW into MIS. Demolish the orthogonal starters afterwards.


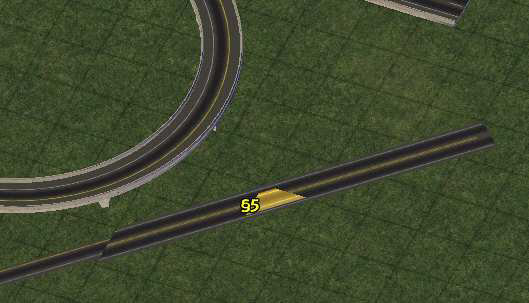
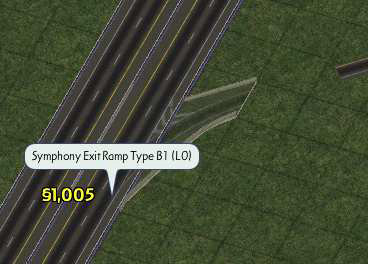
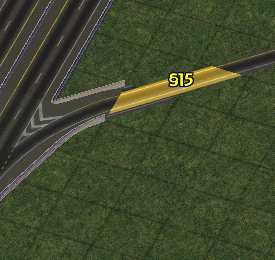
Place down Type B1 Ramps to connect the diagonal MIS to the highway. Use the RHW Tool to connect the MIS to the Ramps.


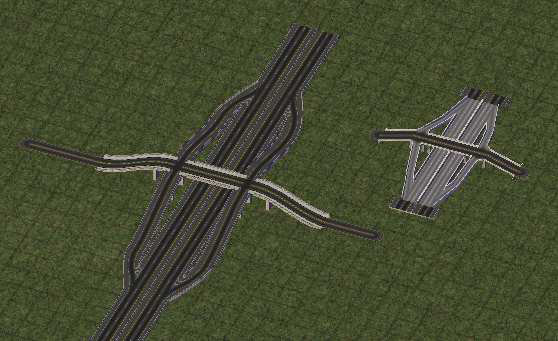
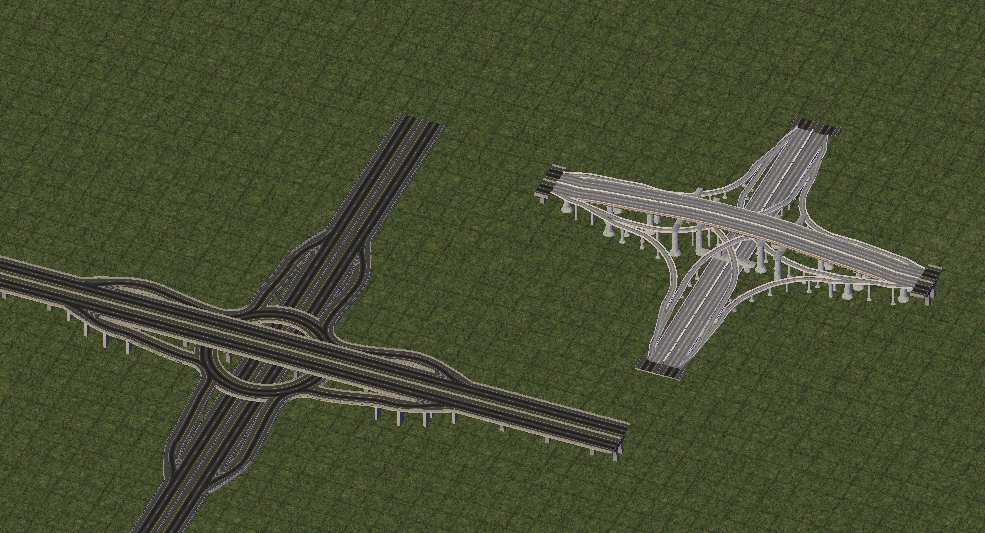
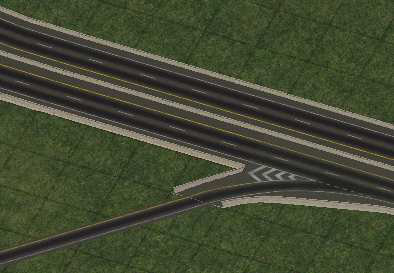
Repeat steps 5 to 8 for the remaining ramps to complete the interchange. The final interchange, shown below, is far larger than the original Cloverleaf Interchange. However, the immense size actually brings the MHO Cloverleaf within reasonable real-life scaling.

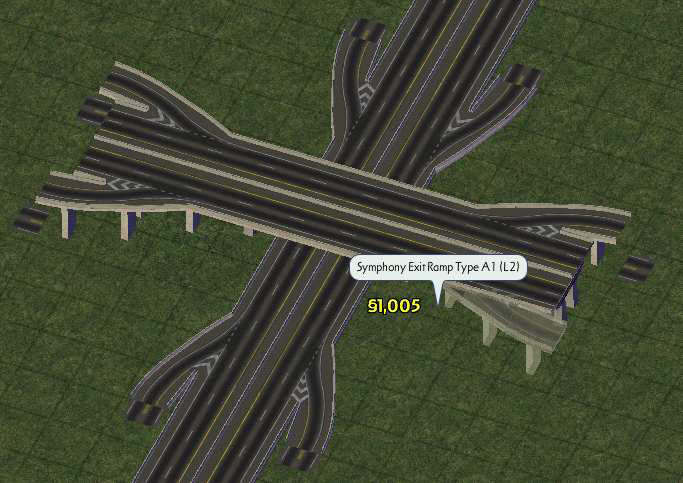
*NOTE: if you use the Euro Textures, there will be no yellow lines; all lines are white in the Euro textured version. In that case, keep an eye on the shoulder lanes or direction arrows at starters. When you use Right Hand Drive (RHD) , make the loop around the cloverleaf interchange is counter-clockwise. With Left Hand Drive (LHD) , this should be clockwise.
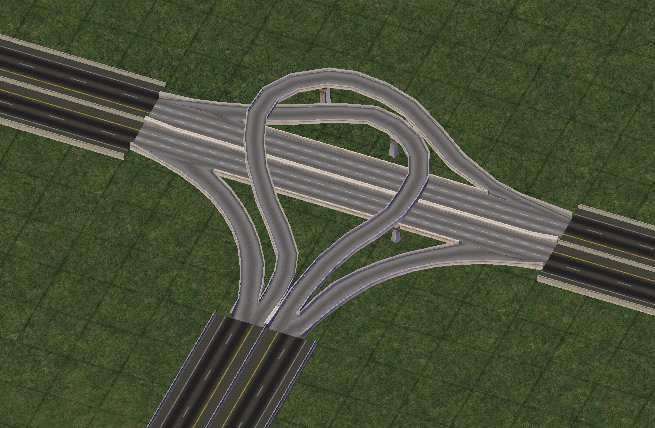
Half Cloverleaf Interchange
The Half Cloverleaf is a variant of the Full Cloverleaf that acts as a three-way junction. It is essentially half of a cloverleaf; only two of the loops and two of the right-turn ramps are present. Additionally, the interchange itself can be upgraded into a Full Cloverleaf if needed.
Drag one single stretch of Ground Highway. This will create the upper “bar” of the interchange.

Place down two Type A1 Ramps. Make sure that they are four tiles from each other.

Drag two four-tile stretches of RHW so that they both bisect the Ground Highway. Make sure these are two tiles apart. This will become the MIS overpasses.

Place an L2 MIS starter on the two RHW “stubs”. This will override the RHW into the needed overpass. Be sure to keep the yellow lines* on the inside. After which, bulldoze the construction lots on the starters and extend each MIS out by four tiles in each direction.
Place two Cloverleaf Ramps as shown. This will connect the overpasses with the ramps.
Place down two L0-L2 MIS Starterless Height Transitions. This will bring the overpasses to the ground.
Place down two MIS S-curves.

Place down two Type E1 Ramps. Make sure they connect with the MIS curves. Follow steps 5 through 8 for the Full Cloverleaf to connect the Type E1 Ramps with the other highway to complete the rest of the interchange.
Current Version Limitations
The following features are currently not possible in this version:
- Flex-based Ramp Interfaces
- Flex-based Roundabout
- Prefab Diamond Interchanges or any other standard prefab Maxis Highway interchange (however, it is possible to build this with other existing puzzle pieces)
List of Items
Networks
- L0 Maxis Highway
- L2 Maxis Highway
Ramp Interfaces*
- L0 Ramp Type A1
- L0 Ramp Type B1
- L0 Ramp Type D1
- L0 Ramp Type E1
- L2 Ramp Type A1
- L2 Ramp Type B1
- L2 Ramp Type D1
- L2 Ramp Type E1
Transitions
- L0-to-L2 MHW transition
- L0-to-L2 OnSlope MHW transition
- L0-to-L1 MIS transition*
- L0-to-L2 MIS transition*
- L1-to-L2 MIS transition*
- L0-to-L2 Cloverleaf ramp*
- Bridge Transition Piece
(Semi-prefabs)*
- L0xL2 Two-level roundabout interchange
- L0xL2 Three-level roundabout interchange
- L0xL0 T-Stack interchange
- L0xL2 T-Stack interchange
- L2xL0 T-Stack interchange
- L2xL2 T-Stack interchange
Curves
- L0 MHW 45 degree smooth curve
- L2 MHW 45 degree smooth curve
- L0 FAMHW-to-Orthogonal curve
- L0 FAMHW-to-Diagonal curve
- L0 FAMHW filler stretch
* NOTE: Orthogonal only
Frequently Asked Questions
Questions Regarding Compatibility with Pre-existing MHWs
Can this mod work side-by-side with the original MHWs?
No. This mod is a complete replacement. However, this is an optional NAM component, so you can choose whether to install it or not.
Do I need to demolish any pre-existing MHWs?
Most of the draggable content will be ported over with no problems. Especially there will be quite a lot of diagonal functionality from the first release, something uncommon with other NAM items. However, you probably need to demolish the interchanges, since those are not converted due to lots of modeling work and vast under-scaling. However, you will be able to build other kinds of interchanges as a replacement with some help of the RHW.
Questions Regarding Functionality and General Features
Why is the RHW installed along with the MHO?
Unlike other override mods in the past, the Maxis Highway Override is the only override mod that features puzzle pieces. Since these pieces rely on parts of the RHW, the RHW will be automatically installed along with the MHO.
Can this be used to draw RHWs?
Technically, no. Since the MHO overrides existing networks, rather than using a starter, RHWs can’t be drawn using the MHO.
Why aren’t there any starters on the Ramp Interfaces?
This will allow you to build more compact interchanges. Starters tend to get in the way in that they take up one extra tile of space, particularly on uneven terrain. There will be stubs however. You can use the starters from the RHW for the ramp construction.
Will there be any prefab interchanges?
No. The massive amount of time required in making one, the size limits imposed on them, the fact that they would duplicate already existing functionality, along with the rigid inflexibility of such setups, the underscaled dimensions of these interchanges and the massive number that would have to be made in order to account for all the networks both MHW and RHW renders the notion of plop interchanges impractical and unworkable. Semi-prefabs will probably the biggest components that will be realised.
The only exception is the T-Interchange.
What about the original interchanges? Won’t those be changed?
No. The original interchanges are too small to work with, and therefore will not be converted.
When I was reading through the documentation, I noticed that this included its own slope mod. I’m using a different slope mod. How do I make the MHO/PS Slope Mod work with the other one I have?
In order to make any other slope mod to work friendly with the Maxis Highway Override, the only value that should be changed is the Ground Highway Placement Tuning Parameters Exemplar file (TGI: 0x6534284A, 0x084344E0, 0x0BE08C87). You only need to set the TunnelModelHeights parameter to “9.25, 9.25”, though setting the MinTerrainSlopeForTunnelStart to 10 is recommended. These values have to be modified using Ilive’s Reader.
Questions Regarding Tunnels and Bridges
Are there tunnels and bridges?
The current Maxis Highway bridges have generally proven very difficult to convert. Only the Level Bridges have received the MHO treatment. For addition bridge styles, you will have to use Avenue Bridges instead, or some of the new dual RHW-4 Bridges. For the tunnels, there will be a 7.5m high ground level tunnel override available, which will require a custom slope mod (included in the mod).
What’s the issue with bridges?
In short, the models for the original MHW bridge are hard to convert to MHO due to the differences in S3D settings and scaling. It isn’t as easy as slipping a small plane that has the RHW texture on it.
What about tunnels for other RHW networks? Is there a way to make it work?
There’s no easy solution for “hijacking” the MHW tunnels and repurposing them such that they bear the tunnel entrance and paths of an RHW network other than dual RHW-4, and many of these complications are EXE-locked and therefore unfixable.
First, the same paths are used for both sides of the MHW tunnel, making asymmetrical pathing impossible, so two-tile RHWs, such as RHW-8S, are out of the question. Secondly, only one tunnel model can be used for each tunnel, since there is no way to drag out and select different tunnels the same way that bridges can be selected and drawn. Thirdly, changing the function of a feature that already works, the MHW tunnels, so that another mod can use is not good practise, as it will cause existing tunnels to cease functioning.
Questions Regarding Cross-Compatibility with Other Mods
Can this work with RHW?
It most certainly can. It’s designed to do just that.
Can this work with other MHW mods?
That depends on what type of mod it is. If it’s a mod that modifies the models, such as the HRS , then it will actually conflict with the Maxis Highway Override. Simple textural mods that work for MHW will not even work with MHO, since the MHO references completely different textures.
T21 modifications may still continue to work with MHO, but depending on how the props are placed, they may be misaligned with the new dimensional specifications.
Questions Regarding Textures
I want to change the textures. What should I look for?
First, you need to know how to mod textures. There are several tutorials about that. The important thing is that the override textures have the same IDs as the original ones. You can find the original textures in the DAT-files of the RHW for reference. You can check out the Maxis Highway Override DATs for texture references of every model. However, changes to MHO textures will also have effect on the elevated RHW. Keep that in mind.
What about Euro Textures?
These are available and included in the NAM.
Questions Regarding General Development
When it will be out?
It will be ready when it’s ready. Besides, who doesn’t like surprises? ;)
Credits
Sources for Documentation
Developers
- jdenm8 (Development/Models, Documentation)
- GDO29Anagram (Documentation, Testing)
- MandelSoft (Development/Models)
- mgb204 (Development/Models/T21s)
- Tarkus (Documentation Revamp)
Testing
- Br22ian
- Samerton
- CasperVG