Network Widening Mod (NWM)
The Network Widening Mod adds 13 new override networks, which extend the game's base Road and One-Way Road networks by providing different width variants, many with higher capacities. This includes 6 single-tile, 5 dual-tile, and 2 triple-tile override networks. Among these networks are the Turning Lane Avenues (TLA), which feature a center turn lane/flush median, multi-lane variants of the Road network, and four additional widths of the One-Way Road (OWR) network. It also includes some degree of diagonal functionality for all networks, transitions to connect NWM networks to Maxis networks or other NAM override networks, a series of Wide-Radius Curve pieces for three of the single-tile networks, and neighbor connector puzzle pieces for selected networks.

Installing the NWM from the NAM Installer
The Network Widening Mod (NWM) is installed as part of the “Network Widening Mod and Turn Lanes” option, under “2 Additional Network Features > Road, One-Way Road, and Avenue”. The NAM’s various turn lane options are also installed under this section. The FLEX Turn Lanes (FTLs) and QuickTurn features are designed specifically for use with the NWM. Note that the Legacy Turn Lane options (Avenue and Road) are not designed for use with the NWM.
It is also highly recommended that users looking to install the NWM also choose to install the “RealExpressway” features, which add additional functionality to the NWM’s One-Way Road-type networks (at present, the OWR-1 and OWR-3).
NWM Override Networks
Overview
The Network Widening Mod (NWM) plugin includes a total of 13 different override networks, which can be grouped into four classes: Roads (RD), One-Way Roads (OWR), [Road-based] Avenues (AVE), and [Road-based] Turning Lane Avenues (TLA).
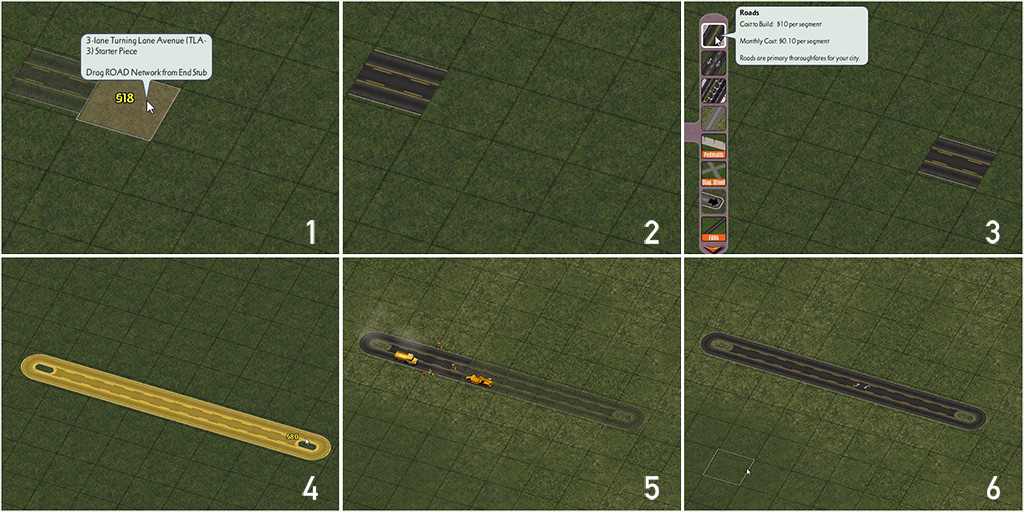
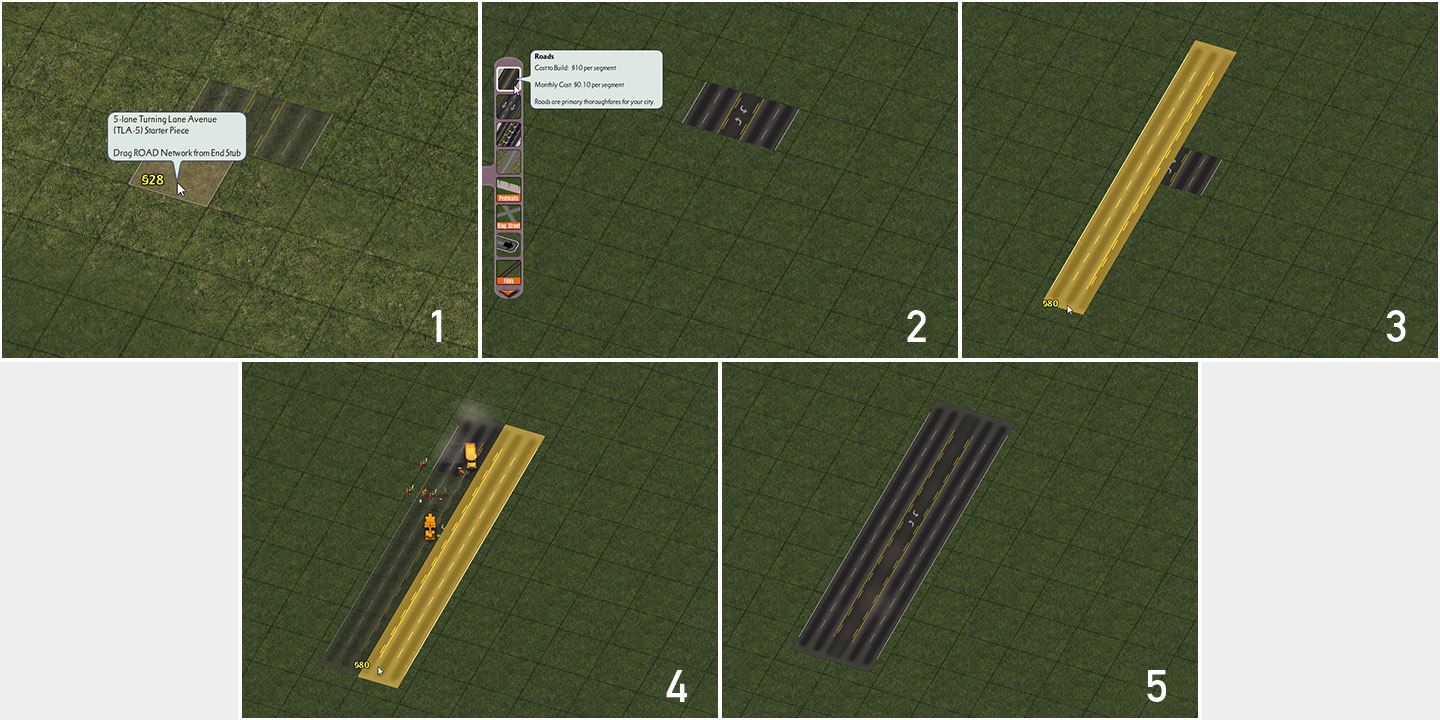
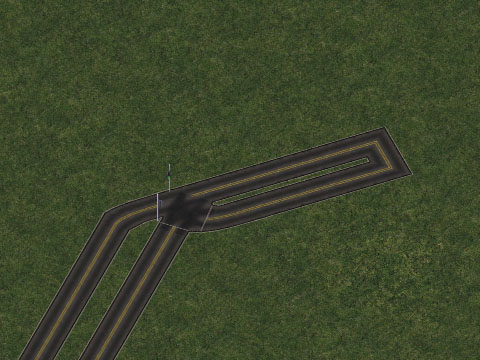
All of these override networks can either be constructed by first placing a Starter Piece, then dragging the appropriate default network through the starter, at which point the draggable network should convert to match the starter. This process is shown below on a Road-based NWM Override Network.
(Click for full resolution)
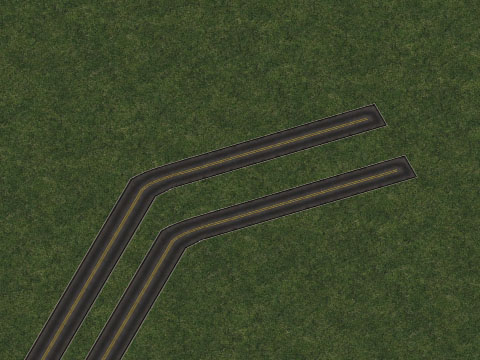
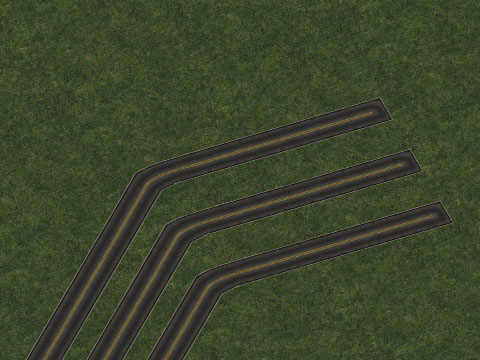
In the case of multi-tile override networks, they are still based off default single-tile networks, mainly due to limitations with the game’s default dual-tile networks, and lack of triple-tile networks. Simply use the same process for each tile in the starter to complete the network.
(Click for full resolution)
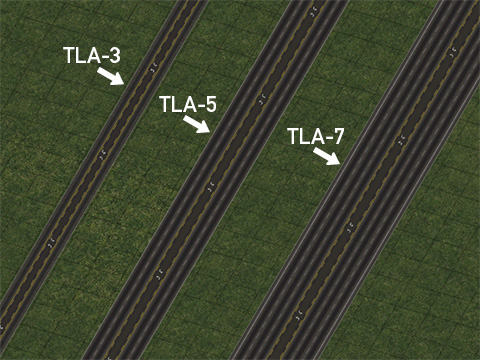
Turning Lane Avenues (TLA) [Road-based]
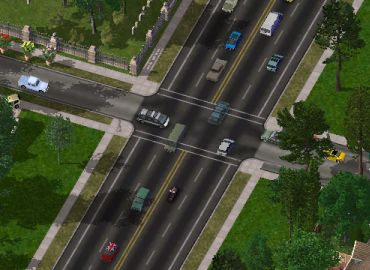
The Turning Lane Avenues, or TLAs, are Road-based override networks that include a paved/flush center turn lane running down the median, as is especially common in North America. In the case of the multi-tile variants, the existence of this center turn lane allows for vehicles to directly access buildings and lots on the far side of the network–something which the game’s default Avenue network does not allow.
There are three total TLA networks presently included in the NWM (note that the center turn lane is included in the lane count associated with each network).
- 3-Lane Turning Lane Avenue (TLA-3) [Single Tile]
- 5-Lane Turning Lane Avenue (TLA-5) [Dual Tile]
- 7-Lane Turning Lane Avenue (TLA-7) [Triple Tile]
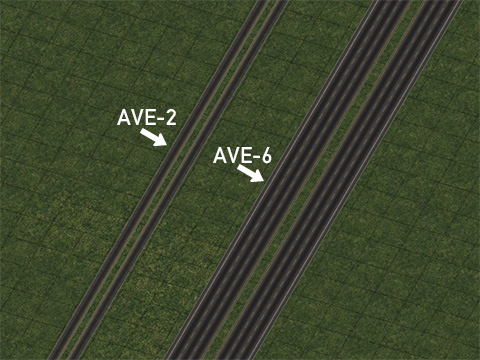
Avenues (AVE) [Road-based]
The Avenues, or AVEs, are Road-based (not Avenue-based–though as of NAM 46, the AVE-6 can be built by using overlapping Avenues for orthogonal stretches) override networks that include a landscaped median divider, much like the game’s default 4-lane Avenue network. Unlike the TLAs, the AVEs do not allow direct access to buildings and lots on the far side of the network.
- 2-Lane Avenue (AVE-2) [Single Tile]
- 6-Lane Avenue (AVE-6) [Triple Tile]
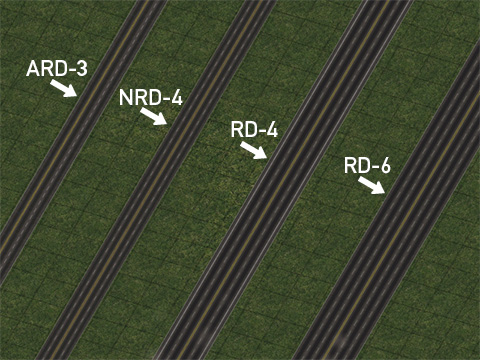
Roads (RD) [Road-based]
The Roads, or RDs, are Road-based override networks that do not feature a median, similar to the game’s default Road network in appearance, but with more lanes. Unlike the TLAs, the RDs do not allow direct access to buildings and lots on the far side of the network.
- 3-Lane Asymmetrical Road (ARD-3) [Single Tile]
- 4-Lane Narrow Road (NRD-4) [Single Tile]
- 4-Lane Road (RD-4) [Dual Tile]
- 6-Lane Road (RD-6) [Dual Tile]
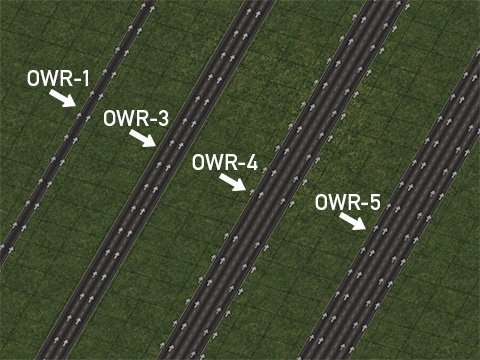
One-Way Roads (OWR) [One-Way Road-based]
The One-Way Roads, or OWRs, are One-Way Road-based override networks that, in contrast to the other networks in the NWM, only allow traffic in a single direction, but feature differing numbers of lanes compared to the game’s default 2-lane One-Way Road setup. Similar to the default One-Way Road network, directionality of each NWM OWR network is determined by draw direction, and these width variants can have their direction reversed in the same way. Due to the presence of crossover paths on the multi-tile variants, it is possible for vehicles to reach buildings and lots on the far side of the network.
- 1-Lane One-Way Road (OWR-1) [Single Tile]
- 3-Lane One-Way Road (OWR-3) [Single Tile]
- 4-Lane One-Way Road (OWR-4) [Dual Tile]
- 5-Lane One-Way Road (OWR-5) [Dual Tile]
Constructing Diagonals and Curves
The diagonal functionality for the single-tile NWM networks is straightforward (and diagonal starters are provided for all single-tile networks, except the NRD-4), but dual and triple-tile NWM networks may prove to be less intuitive at first, as there are different construction methods used, depending on the network.
The RD-4 and OWR-4 operate on a “shared-tile” setup. Here is how the base layout (without the overrides) looks for a shared-tile setup:
The TLA-5, OWR-5 and RD-6 operate on a “split tile” setup. here is how the base layout (without the overrides) looks for a split-tile setup:
The TLA-7 and AVE-6 operate on a slightly larger “split tile setup”:
Transitioning to Other Networks
There are three methods by which one can create a transition between an NWM network and another network: the Draggable Stub Method, the draggable Direct Connection Method, and the use of Puzzle Pieces.
Note that, except in the case of setups not otherwise covered, the Puzzle Piece method is largely considered deprecated/outdated, due to its lack of support for wealth-level textures.
Draggable Stub Method
The Draggable Stub Method is used to transition between an override network and its base network (i.e. from ARD-3 to Road) or between two override networks sharing the same base network (i.e. from RD-4 to RD-6). In order to create transitions that use this method, simply drag each network such that the end stubs of each network are right next to one another, as seen below on the left. Provided the combination of networks is one that is supported, the stubs will convert into a transition between the networks, as seen on the right. This method will also work for networks of different tile widths (i.e. TLA-3 to TLA-5)
Direct Connection Method
The Direct Connection Method is generally used to transition between an override network and a network (default or override) built from a different base (i.e. from TLA-5 to Avenue, or from TLA-3 to RHW-2). In order to create transitions that use this method, simply drag one network into the other, similar to the fashion shown below. Provided the combination of networks is one that is supported, the direct connection will convert into a transition between the networks, as seen on the right.
Puzzle Piece Method LEGACY
The Puzzle Piece Method entails using the items found under the NWM Transition Puzzle Pieces button. To create a transition, simply find the desired puzzle piece from the menu, aligning the preview to where one wishes to place it, and clicking to plop the piece. Note that some of the puzzle-based transitions do not have NWM Starters on their ends, and the base network setup must be built before plopping the puzzle piece.
Note: With the exception of some setups that are not supported any other way, the Puzzle Piece Method is deprecated/outdated. All future additions to the repertoire of NWM transitions will be in draggable form, using either the Draggable Stub or Direct Connection Methods, as appropriate. Draggable treatments for all of the existing puzzle pieces are planned for a future NAM release.
A full listing of supported draggable transitions can be found in the Network Capabilities section. A listing of the existing transition puzzle pieces can be found in the Menu Items section.
Capacities and Speeds
The capacity of each network depends on the Traffic Plugin one has installed. Capacity is generally calculated on a per tile basis by the game. All NWM networks are also surface street-type networks, meaning that they allow full access to RCI Zones. The capacities for the five standard capacity levels of the NAM Traffic Plugin are listed below. Please note that these capacities listed are for the full width of the network, rather than the per-tile capacity.
With the exception of the OWR-1 and RD-4 networks, which share the same capacity as their respective base networks, all other NWM networks have a capacity that is 125% of that of the base network used in the override network setup, as a result of using a special pathing setup that allows a one-time capacity boost of 25%. This is why the NRD-4, despite having an additional lane, has the same capacity as the other boosted single-tile networks, as well as why the OWR-1 has the same capacity as the base One-Way Road. Since crossover paths on multi-tile override networks trigger the boost, the OWR-5 has the same capacity as the OWR-4, though the use of a split tile diagonals on the OWR-5 will give it a higher diagonal capacity than the OWR-4 and its shared tile diagonals.
Capacities
| Network | Tile Width | Classic | Low | Medium | High | Ultra |
|---|---|---|---|---|---|---|
| TLA-3: | 1 | 1500 | 3000 | 5000 | 7500 | 15000 |
| AVE-2: | 1 | 1500 | 3000 | 5000 | 7500 | 15000 |
| ARD-3: | 1 | 1500 | 3000 | 5000 | 7500 | 15000 |
| OWR-1 | 1 | 1800 | 3600 | 6000 | 9000 | 18000 |
| OWR-3 | 1 | 2250 | 4500 | 7500 | 11250 | 22500 |
| NRD-4: | 1 | 1500 | 3000 | 5000 | 7500 | 15000 |
| TLA-5: | 2 | 3000 | 6000 | 10000 | 15000 | 30000 |
| OWR-4 | 2 | 4500 | 9000 | 15000 | 22500 | 45000 |
| OWR-5 | 2 | 4500 | 9000 | 15000 | 22500 | 45000 |
| RD-4: | 2 | 2400 | 4800 | 8000 | 12000 | 24000 |
| TLA-6: | 2 | 3000 | 6000 | 10000 | 15000 | 30000 |
| TLA-7: | 3 | 4500 | 9000 | 15000 | 22500 | 45000 |
| AVE-6: | 3 | 4500 | 9000 | 15000 | 22500 | 45000 |
With respect to speeds, these networks will have the same catalog speed as their default counterparts. Speeds
| Travel Type | Road-Based | One-Way Road-Based | Avenue-Based |
|---|---|---|---|
| Car: | 50 | 75 | 50 |
| Bus: | 45 | 65 | 45 |
| Freight Truck: | 40 | 60 | 45 |
Note, however, that these catalog speeds are for 25% of catalog capacity, and that speeds on empty networks will exceed these figures by 30%, declining as the networks increase in volume per the Congestion vs. Speed Curve. Since many of the NWM networks have a boosted capacity, they will not reach the 100% figure as quickly, thereby allowing for higher speeds at higher volumes.
Network Capabilities
See the Network Widening Mod Technical Specs Section.
List of Menu Items
NWM Starters
- TLA-3 Orthogonal Starter / Diagonal Starter
- AVE-2 Orthogonal Starter / Diagonal Starter
- ARD-3 Orthogonal Starter / Diagonal Starter
- NRD-4 Orthogonal Starter
- OWR-1 Orthogonal Starter / Diagonal Starter
- OWR-3 Orthogonal Starter / Diagonal Starter
- TLA-5 Orthogonal Starter
- RD-4 Orthogonal Starter
- RD-6 Orthogonal Starter
- OWR-4 Orthogonal Starter
- OWR-5 Orthogonal Starter
- TLA-7 Orthogonal Starter
- AVE-6 Orthogonal Starter
NWM Multi-Radius Curve Pieces
- Road R2 45° (Supports TLA-3, AVE-2, ARD-3, and NRD-4)
- Road R3 45° (Supports TLA-3, AVE-2, ARD-3, and NRD-4)
- Road R4 45° (Supports TLA-3, AVE-2, ARD-3, and NRD-4)
- Road R5 45° (Supports TLA-3, AVE-2, ARD-3, and NRD-4)
- Dual-Tile R3 45° (Supports TLA-5, RD-6)
- Dual-Tile R4 45° (Supports TLA-5, RD-6)
- Dual-Tile R5 45° (Supports TLA-5, RD-6)
- Shared Dual-Tile R3 45° (Supports RD-4)
- Shared Dual-Tile R4 45° (Supports RD-4)
- Shared Dual-Tile R5 45° (Supports RD-4)
NWM Wide-Radius Curve Pieces
- TLA-3 S-Curve
- TLA-3 45-Degree Curve
- TLA-3 90-Degree Curve (Large)
- TLA-3 90-Degree Curve (Small)
- AVE-2 S-Curve
- AVE-2 45-Degree Curve
- AVE-2 90-Degree Curve (Large)
- AVE-2 90-Degree Curve (Small)
- ARD-3 S-Curve
- ARD-3 45-Degree Curve
- ARD-3 90-Degree Curve (Large)
- ARD-3 90-Degree Curve (Small)
NWM Transition Puzzle Pieces
- Road-to-TLA-3 Transition
- Road-to-AVE-2 Transition
- Road-to-ARD-3 Transition
- Road-to-NRD-4 Transition
- OWR-1-to-2 Transition
- OWR-2-to-3 Transition
- TLA-3-to-AVE-2 Transition
- TLA-3-to-ARD-3 Transition
- AVE-2-to-ARD-3 Transition
- Road-to-TLA-3 Transition Diagonal
- Road-to-AVE-2 Transition Diagonal
- Road-to-ARD-3 Transition Diagonal
- OWR-1-to-2 Diagonal Transition
- OWR-2-to-3 Diagonal Transition
- Road-to-AVE-2 Transition Type B*
- AVE-4-to-AVE-2 Transition
- TLA-3-to-ARD-3 Transition Diagonal*
- TLA-3-to-AVE-2 Transition Diagonal*
- AVE-2-to-ARD-3 Transition Diagonal*
- RD-4 to AVE-4 Transition Type A
- RD-4 to AVE-4 Transition Type B*
- Rd-4 to TLA-5 Transition
- RD-4 to RD-6 Transition
- RD-6 to AVE-4 Transition Type A
- RD-6 to AVE-4 Transition Type B*
- RD-6 to TLA-5 Transition
- TLA-5 to AVE-4 Transition
- OWR-3 to OWR-4 Transition
- OWR-3 to OWR-5 Transition*
- OWR-4 to OWR-5 Transition
- AVE-4 to AVE-6 Transition*
- TLA-7 to AVE-6 Transition
NWM Neighbor Connector Pieces
- TLA-5 Neighbor Connector
- RD-4 Neighbor Connector
- RD-6 Neighbor Connector
- TLA-7 Neighbor Connector
- AVE-6 Neighbor Connector
NWM Triple-Tile Network Turn Lane Extension Pieces (TuLEPs)
- TLA-7/AVE-6 Type 130 Transition
- TLA-7/AVE-6 Type 130 TuLEP
- TLA-7/AVE-6 Type 130 Blank TuLEP
- TLA-7/AVE-6 Type 130 x Avenue Type 120 (a) +-Intersection (b) T-Intersection
- TLA-7/AVE-6 Type 130 x Road Type 110 (a) +-Intersection (b) T-Intersection
- TLA-7/AVE-6 Type 130 x TLA-7/AVE-6 Type 130 (a) +-Intersection (b) T-Intersection
NWM Bridges (found under the Road, One-Way Road, and Avenue Bridges dialogs)
- NRD-4 Thru Truss (Road-based)
- OWR-3 Thru Truss (One-Way Road-based)
- RD-4 Blue Steel Girder (Avenue-based)
- RD-4 Brown Steel Girder (Avenue-based)
- RD-4 Red Steel Girder (Avenue-based)
- RD-4 Steel Under Deck Arch (Avenue-based)
- RD-4 Plain (Avenue-based)
- RD-6 Blue Steel Girder (Avenue-based)
- RD-6 Brown Steel Girder (Avenue-based)
- RD-6 Red Steel Girder (Avenue-based)
- RD-6 Steel Under Deck Arch (Avenue-based)
- RD-6 Plain (Avenue-based)
- OWR-4 Blue Steel Girder (Avenue-based)
- OWR-4 Brown Steel Girder (Avenue-based)
- OWR-4 Red Steel Girder (Avenue-based)
- OWR-4 Steel Under Deck Arch (Avenue-based)
- OWR-5 Blue Steel Girder (Avenue-based)
- OWR-5 Brown Steel Girder (Avenue-based)
- OWR-5 Red Steel Girder (Avenue-based)
- OWR-5 Steel Under Deck Arch (Avenue-based)